Posted in Research tips

Researching Spanish Families in Early California

Secretary of State of California - Wikipedia

Reprinted with permission from a series of articles written by Gary Carlsen for the Monterey County Genealogy Society Newsletter, from 1997-1999.

Monterey History “They Followed Serra” part 8

Researching Spanish families in early California can be difficult at best, but the following can be extremely helpful in locating your ancestors.

Once the ancestor’s family name is located a good staring point is Marie Northrup’s two volumes, Spanish-Mexican Families of Early California, 1769-1850. The families are listed alphabetically by last name, and includes known information on the spouse and children. In many cases the children’s families are also listed. She includes a brief description of military service, taken from Bancroft’s Pioneer Index, at the end of each family.

In addition to Northrup’s volumes Dorothy G. Mutnik has put together five volumes, Some Alta California Pioneers and Descendants Division One and Two. Division One consists of three volumes and covers descendants of the Anza expeditions, while Division Two, which is two volumes covers the 1781 Expeditions to settle Los Angeles and establish the Santa Barbara Presidio. Her work was based on mission records, and the families are listed alphabetically by family name, then spouses name. She has included many notes and sites the location of the events occurring within the families.

Presidio lists of 1782 for San Diego, Santa Barbara, Monterey, and San Francisco are available in the Eldrige Papers of the Bancroft Library. San Diego and Monterey were copied by Northrup and are available on LDS film 1421704, item 12.

Hubert Howe Bancroft’s 7 volume History of California notes military service and other activities when found in Spanish records. While these do not contain a lot of genealogical information, they do list places and times where the soldier was listed. Vol I and II cover the Spanish period, and III and IV the Mexican period.

1790 Padron (census) lists soldiers and their families. While the soldier and spouse are listed by name, children are listed only by sex and age. These lists are available on LDS film 1036747, and were published by Northrup in issues of the Historical Society of Southern California Quarterly.

Service records for California soldiers are stored in the Archives of the Indies in Seville, Spain, and 900 of these records were abstracted by Raymond F. Wood. They were placed in the Research Library of the Autry Museum of Western Heritage, in Griffith Park in Los Angeles.

An Alphabetical Listing of the California Mission Vital Records was recorded by Thomas Workman Temple III, and is available on LDS Micro Fiche 6047009. This listing shows the page, entry no., date, mission, book, and name.

Many of the early mission records have been microfilmed by the LDS Church, and are available through local Family History Centers including Monterey…

[NOTE: The Early California Population Project at https://www.huntington.org/ecpp is an online database of baptism, marriage, and burial records from California missions.]

Northrup, Mutnik, and Bancroft’s books are available through most libraries in California, or through inter-library loan from the California State Library in Sacramento.

Posted in Research tips

Why Was the Information Removed from Online?

I am sharing an article found on Eastman’s Online Genealogy Newsletter (by Dick Eastman) which I found interesting and thought you might, too.

Dick Eastman July 28, 2020

NOTE: This is a slightly updated version of an article I published four years ago. The subject arose again recently so I decided to republish this for the benefit of newer readers who did not see the earlier article. I also updated some of the text to better describe newer developments.

Several newsletter readers have sent messages to me expressing dissatisfaction with records that were available online at one time but have since disappeared. I am offering this republished article as an explanation about why we should not be surprised when that happens. I will also offer a suggestion as to making sure you keep your own copies of online records that are valuable to you.

Two newsletter readers sent email messages to me recently expressing dissatisfaction that a set of images of vital records has been removed from a popular genealogy site. Indeed, removal of any online records of genealogical value is sad, but not unusual. Changes such as these are quite common on FamilySearch, MyHeritage, Ancestry.com, Fold3, Findmypast, and many other genealogy sites that provide images of old records online. Removal of datasets has occurred dozens of times in the past, and I suspect such things will continue to happen in the future. I thought I would write a brief explanation.

Contracts

In most cases, information of genealogical value obtained from government agencies, religious groups, museums, genealogy societies, and other organizations is provided under contractual agreements. The contracts specify what information is to provided, how it is to be made available, and what price the web site owner has to pay to the provider for the records. All contracts also have a defined expiration date, typically 2 years or 3 years or perhaps 5 years after the contract is signed.

When a contract nears expiration, the two parties usually attempt to renegotiate the contract. Sometimes renewal is automatic, but more often it is not. Maybe the information provider (typically an archive) decides they want more money, or maybe they decide they no longer want to supply the data to the online genealogy service. For instance, in the time the information has been available online, the information provider may have learned just how valuable the information really is. The information provider may decide to ask for more money or may even refuse to provide the information any more since the provider may have a NEW plan to create their own web site and offer the same information online on their new site for a fee, hereby generating more revenue for the provider than that of the expiring contractual agreement.

Sure, that stinks for those of us who would like to have the information everywhere; but, it makes sense to most everyone else. I am sure the budget officer at most any state or local government archive thinks it makes sense.

Every contract renegotiation is different, but it is not unusual to agree to disagree. The contract ends, and the web site provider legally MUST remove the information from their web site. The same thing frequently happens to all the online sites that provide old records online.

GDPR

Another issue that has become a problem recently is the European GDPR (General Data Protection Regulation). These new rules apply to all public records in Europe. These regulations arose because of the concept of the “right to be forgotten,” mostly concerning people who had legal problems in the past but have since reformed and do not want the old records to constantly create new problems. The regulations are generic and open to various interpretations. While not specifically requiring information about ancestors of 100 years ago or even earlier to be removed from public view, many people and organizations have taken a conservative approach and deleted any record sets that are even slightly questionable under the new rules.

A full discussion of the GDPR would consume hundreds or even thousands of web pages so I won’t attempt that here. Instead, you can find many online articles that address the issues created by the GDPR by starting at Wikipedia at https://en.wikipedia.org/wiki/General_Data_Protection_Regulation and then moving on to https://duckduckgo.com/?q=gdpr&t=hi&ia=news.

One problem for web publishers is how to create two separate services: one to display European records that comply with the GDPR and also create a second service that displays records from the rest of the world. Some web publishers have simply removed ALL records that might not comply with the GDPR regulations, regardless of the geography involved.

The moral of this story

If you find a record online that is valuable to you, SAVE IT NOW! Save it to your hard drive and make a backup copy and save it someplace else as well. If there is no option to save, make a screen shot and save it on your hard drive and save another copy, either in the cloud or some other place off-site where it will last for many years. Just because you can see the record online today does not mean that it will be available forever.

Posted in Research tips

How I digitized my research and gave it all to you…Part 2: I used my phone!

In a previous post I discussed how I digitized my genealogy files and added them to the FamilySearch Family Tree as a way to share them with relatives and archive them for posterity.   As awe-inspiring as that post was, I am happy to report I’ve found an even easier way to accomplish this!

And if the idea of sharing ALL your files with anyone is too overwhelming to think about, how about an easy way to just share a few? We’ve all got a few documents or photos that nobody else in the family has, and we can all benefit from sharing those unique sources.  Whether you have just a few items or a file cabinet full, the methodology is the same for digitizing it and sharing it using the FamilySearch Family Tree or Memories app for phones and tablets. Yep, I’m not exactly ditching my full-size scanner, but I want to show you how you can use any scanner app to easily digitize records and upload them to the FamilySearch Family Tree.

Lately I’ve been giving serious thought to what will happen to all my files after I’m gone, and I do not want anyone else to have to sort through them to determine what’s worth keeping.  (Yep, I still have a few binders left—I didn’t actually give it all to you the first go-around.) At the Family History Center where I volunteer someone recently dropped off a huge amount of boxes containing their parent’s research.  It is largely useless to anyone in this format, even though everything was in tidy file folders.  It made me sad to see.  Trust me—nobody wants your boxes of stuff!  That does not mean it is not extremely valuable to someone.  It’s just that the “stuff” will never be seen by that someone.  What I’m suggesting in this post is a way to almost guarantee it will be seen by that someone who cares, and all your years of researching will be passed on in a way that will interest those who see it.  It will have context and meaning.

I should start off by giving you a little background on why I choose the FamilySearch Family Tree to share my files.

First, the Family Tree is a collaborative (shared) tree, meaning whatever I add will be viewable to my relatives, and whatever they add will be viewable to me.  If my cousin adds an old newspaper clipping to our grandfather’s page, it will show up for all of us to see on “our” trees.  We do not have to share files back and forth because there is only one tree.  If my children log in to their accounts, they will see those same pictures attached to their great-grandfather.

Second, the FamilySearch Family Tree is not going away.  The things I share there will be available to my kids’ kids’ kids’ kids’ kids’ kids’ kids’ kids’.

There are several ways to add your digitized files to the Family Tree.  It can be done from within the FamilySearch website directly onto the tree, it can be done using the Family Tree app on your phone or tablet, or it can be done using the FamilySearch Memories app.  Today I’d like to show you how to add these documents using the phone apps.  To try this out yourself you will first need to create a free FamilySearch account.

How to add documents to the Family Tree using FamilySearch Family Tree app

The Family Tree app looks like this.  It is free.  FT

You will also need to download a scanner app to your phone or tablet.  Two I like are Genius Scan and Turbo Scan.  I think they both have a free version.

Download the apps to your phone or tablet, find a document you’d like to attach to your online tree, and follow these steps:

2019-07-01 14-27

  1. Take photo of document with a phone scanner app such as Genius Scan. It squares up the corners of the document and crops background so all you have left is a scan of the document.  (Can use other apps if preferred.)
  2. Export to your camera’s photos (click on square with arrow).  NOTE:  The save to photo option only appears if you choose JPG format.
  3. Open the FamilySearch Family Tree app to the person you want to add the document to.
  4. Select “Memories”
  5. Click the green plus sign
  6. Click “Add document”img_7086
  7. Your camera roll will appear.  Tap on the document you want to attach.
  8. Click “Upload”
  9. SAVE
  10. Delete the document from your GeniusScan and camera roll if desired.

The document will now appear as a “memory” in the Family Tree. There, you can open up the image and assign a title, add an event date and place, provide a description, and tag everyone in the document so it will appear as a memory in their Memories area.  You can even record an audio file that will be attached to the document!

img_7085

How to add documents to the Family Tree using FamilySearch Memories app

The FamilySearch Memories app looks like this.  It is also free.  memories

Download it to your phone or tablet, find a document you’d like to attach to your online tree, and follow these steps:

  1. Take photo of document with a phone scanner app such as Genius Scan. It squares up the corners of the document and crops background so all you have left is a scan of the document.  (Can use other apps if preferred.)
  2. Export to your camera’s photos (click on square with arrow).  NOTE:  The save to photo option only appears if you choose JPG format.
  3. Open the Memories app
  4. Tap the green plus sign
  5. Tap “Add Document”
  6. Your phone’s camera roll will appear
  7. Tap the document you want to upload to the Family Tree and then tap “Upload”
  8. SAVE
  9. Your document will now appear in your app’s photo/document gallery
  10. Tap the document and then add a title
  11. Notice the microphone?  You can talk about this document and the audio file will be attached to the document
  12. Last and most important step:  Tap the silhouette with the green plus sign and then tap the image.  This will allow you to “tag” the image with the name of the person in the tree you are attaching this file to.   If you do not tag it, it will just be a floater in your photo gallery, and will not be attached to an individual’s Memories area.  Above, in the Family Tree app this step is not necessary because you first choose the individual before adding the memory.

What do you think?  Have you used either of these apps this way?  The apps allow you to take a photo of a document from within the app, but I prefer using a scanner app first because it creates a nicer-looking document with squared corners and no background.  The Memories app does allow for a speedy workflow, scanning a bunch of documents first, then opening up the gallery and tagging each image, but try out both methods and see which one works best for you.


Posted in Census, Non-population schedules, Research tips

Looking for Easy Access to Federal Non-Population Census Schedules?

As genealogists we all use the federal population schedules (you know…the censuses).  They are one of the most reliable tools in our research toolboxes when searching for ancestors in the United States—the hammers and duct tape of genealogy.

What are non-population schedules?

But what about those non-population schedules–you know (or maybe you are hearing this for the first time), the schedules for manufacturing, agriculture, mortality, and what were called “defective, dependent, and delinquent” classes.  Maybe they are the 1/4″ socket wrench in your toolbox that doesn’t get used much, or maybe they don’t get used at all because you don’t know where to find them.  (For a thorough discussion of non-population schedules see this article and links on the National Archives website.)

Well, maybe an agricultural schedule won’t give you the names of an entire household or your ancestor’s birthplace or date of immigration, but who wouldn’t like to know the value of their ancestor’s farm and farming implements, what crops they grew, and what kind of livestock they raised?

We can use these non-population schedules to inform us in the absence of land and tax records and for help in distinguishing between two people of the same name.  Other non-population schedules provided valuable health and sociological data.  The 1850 and 1860 agriculture schedules are also useful for those researching enslaved ancestors.

Here’s a snippit of the 1860 Agriculture Schedule for San Saba County, Texas, and the first two individuals on the page are my second and third great-grandfathers–Thomas Gooch and his father-in-law William Jennings.  The third individual is Thomas’s brother-in-law Strampkey Jennings.

Agriculture Schedule for San Saba TX 1860

How do we find them?  (The easy way!)

So how do we find these non-population schedules?  The easiest way I know is to access tables in the FamilySearch Wiki which have links to online images and indexes for each state.  Here’s what the table for California looks like, and a link to the page if you want to access the live links.

Non-population schedules for California on FS

In the FamilySearch Wiki these tables exist for every state.  Just enter the search terms     “[State] census” and scroll down the results until you see the table.

The table contains links to images at Ancestry and FamilySearch.  Pay attention to the different columns; if you have a personal Ancestry account use the “Ancestry Home” column, but if you are accessing it from a Family History Center or a library that has the institution version of Ancestry click on one of those columns for free access. FamilySearch has limited availability, but it is free.


Posted in Familysearch, Research tips

New Useful Tool on FamilySearch You Will Love


“Various Tools” photo by George Tsartsianidis on Getty Images

I just discovered a new tool on Family Search Family Tree that is soooo helpful.  I don’t know how long it has been on the site, but they are adding new things all the time so maybe it hasn’t been long, or I just haven’t noticed it.  But  it is something that allows you to take all the information that has been indexed from a record, copy it to your clipboard, and paste it in whatever word processor or genealogy program you want, all nicely formatted and with a complete source citation.

Wow, if I had had this years ago it would have saved me a ton of time!

Here is how to access this new tool:

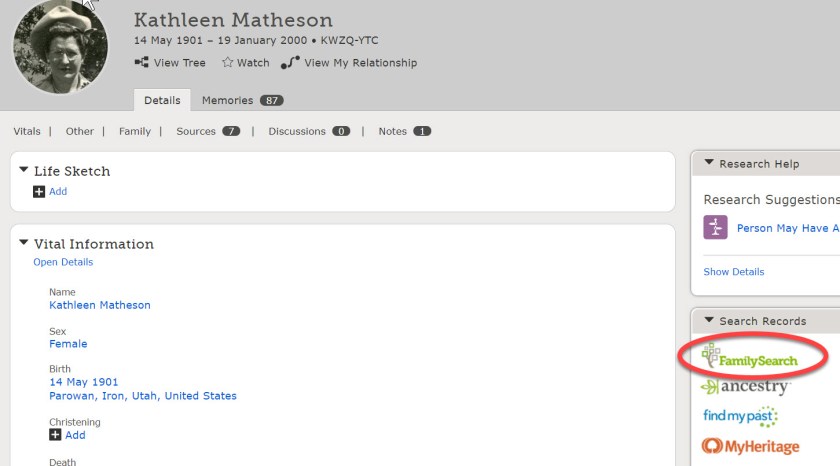
1. Open a person’s page in the FamilySearch Family Tree. Click on FamilySearch on the right side of the page in the “Search Records” area.  This will tell FamilySearch to search for records which match this person in its vast database.

2.  When you see a record that looks like a match in the search results list, click on the document icon to bring up an abstract and possibly an image of the record. (If you see a camera icon you know there will be an image available.)

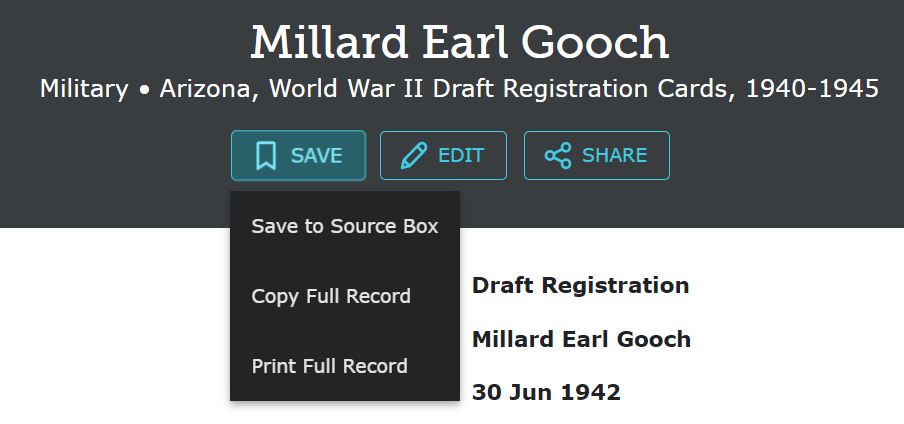
3.  When the record abstract comes up, click on the “Save” box.

4.  Under the “Save” drop down menu click on “Copy full record”.

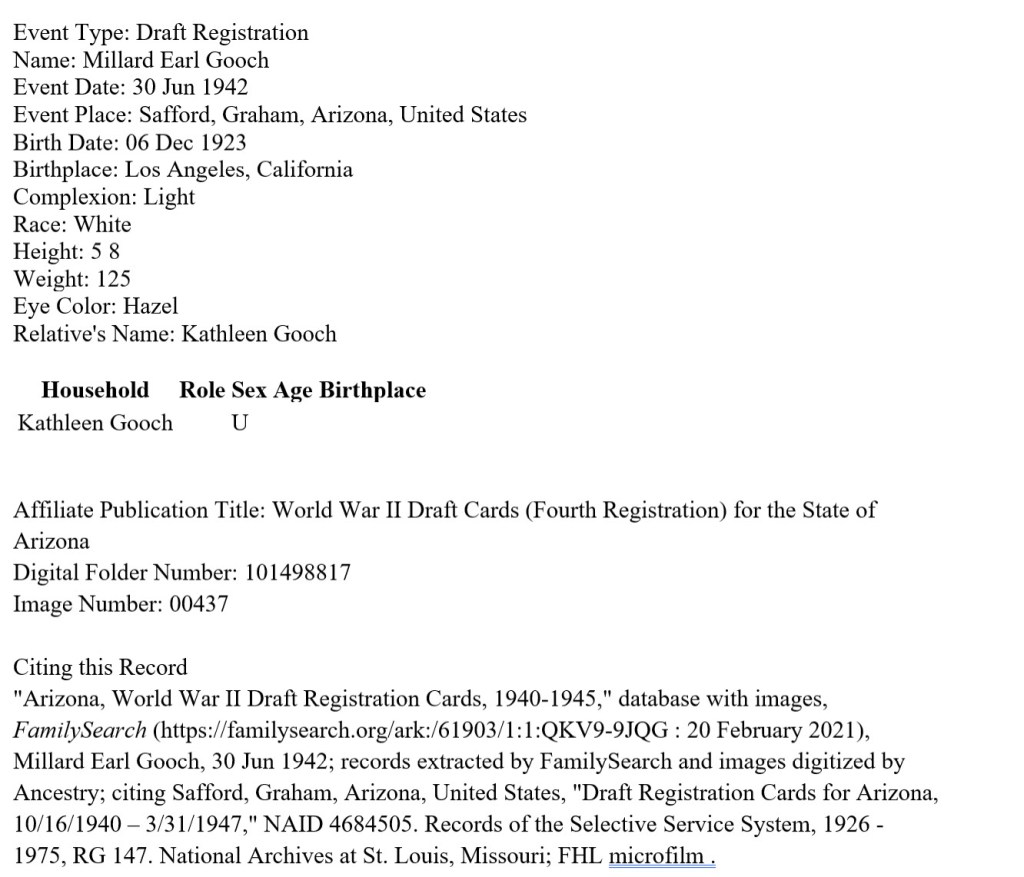
5.  Open up a word processor or the notes area of your genealogy program and “Paste”. An abstract of the record, complete with source citation will appear in your document or program!

Keep in mind this only works with records found in the FamilySearch database, and not the other websites linked to the “Search Records” box, but you can experiment with copying and pasting directly from records on Ancestry, Find My Past, and MyHeritage.